Monday, March 21, 2011

Design Idea: The Crowning Touch!

Who doesn't loooooove crowns! I put them on anyone or anything standing still....they are so in right now (and have been). One lady told me there are "crown clubs" who purchase many of her crowns regularly. I should belong, the way I stick crowns all over my house, inside and out.  Anytime I travel crowns are one of the things I always look for...I found three crowns, like the one above, on a visit to relatives and friends in West Virginia and Virginia three years ago. They look like a really old crown, but they must be reproductions, as I have seen smaller versions of them here, more recently.


Rusty crown-rusty bust! Actually Socrates (I think) came from a shopping trip to Rosarito Beach a long time ago and he is concrete just painted with a rust paint.  The guys who used to run this outdoor garden place did really great finishes on their concrete statues and stuff. I miss going there for my outdoor pots and such. (sigh)

The headless goddess is holding her crown since she has no head to put it on.  I found her at Kobey's Swap Meet almost ten years ago. I haven't been there in a long time, but I love flea markets, swap meets and anywhere old treasures are waiting to be found.


The key to "crowning" is to see crowns that are waiting to be unveiled....the above "crown" is actually part of a chandelier that had been taken apart and recycled.....fits perfectly....

For those of you who met My Guy, the Harlequin/Jester Chandelier man, when I introduced him at Urban Barn, know how much I loooooooved him...he is soooooo handsome and was one of those things that turned out better than I had imagined.....anyway, I really did try to sell him (giggle, giggle)....but I knew he was meant to live with me, so he now resides in the front room and I do believe that is a smile on his face......


A Crown and a Cage....you have seen my smaller bird cages with the crowns, even the birds too have crowns....well, this cage which occupies a small little plot in the yard is actually about four feet tall; I could actually sit in there, okay! okay! a few years ago I could have fit in there (smile)...I keep looking for just the right tenant to live there...I have two large brass quail and two large brass cranes, but, of course, I want to go for the unexpected.....I'll keep you posted....

(above)  Room To Rent!!!

This lovely winged lady, also found in Rosarito Beach years ago, is actually wearing a curly wired bowl that I just cut the bottom out of so it would sit on her head ....finishing touch!


The Bather got her crown right after I added more smokey glaze to her too white body and ...
doesn't it suit her!

.
My husband found this bronze beauty at an estate sale years ago (many people who visit do wonder what is with all the heads, busts, statues, etc. living among us; I have no real answer, they all just moved in and never left).....anyway, not to take away from her beauty, a twisted grape vine is all she needed...

Just a few ideas to put the crowning touch on something or someone at your home. It's late and I'm putting on my tiara and going to bed now.....Good Night...(smile)


Weekend Haul...


Found some great things this weekend....AND LET THE TRANSFORMATIONS BEGIN!!  Keep checking back from time to time to see what fun we're having giving a new look and a new life to all these fun objects.  It's going to be hard selling those great vintage chairs and table.  This is my biggest dilemma always....I want to keep too many treasures, but Ashley helps me remember that redesigning and rebuilding for others to enjoy is what I really like to do. Several of my little darling bird nests will have new homes  in some of these pieces. I know exactly how I'm using the floor lamp and the trophy; and Mr. Mannequin has a plan.... 


The roses are really beginning to explode!  It's so hard working every day just on pieces for whitehorserelics.....I can't stay out of the yard and garden...New mulch for the roses...rust, black spot treatments, snails, etc. can't be ignored....


Love this arbor of  Lady Banks roses!  Found these four wonderful arches at Cordova Gardens in Encinitas about 4 or 5 years ago...he had made some for a lady for her property so she could ride her horses through the arbor, I was lucky enough to be there at the right time to snatch these up and we had the perfect spot for them!

Saturday, March 19, 2011

Design Idea: Light in Flight

Chandelier in Guest Bathroom

Here's an idea to transform a typical chandelier into a one of a kind eclectic piece. The brass chandelier was spray painted creamy white.  The frosted chandelier bulbs work best with the wings and overall look.   


Just tie feathered wings to the protective paper covers with wired ribbon.


Wings can be found at local craft stores.  The best wings are the kind that are bendable.


Voila! Instant Beauty! An easy way to transform a light fixture, a candelabra and more.
Lights in Flight!

Thursday, March 17, 2011

Design Idea: Out on a Limb


This is a great idea for displaying/storing headbands an hair accessories.  Denise hung these faux plastic tree branches beside my daughter Bella's mirror for easy access and storage of Bella's most beloved accessory.  Having the headbands right beside the mirror also proves great for those late school mornings when we're running out the door and a quick decision needs to be made on which headband goes with the outfit. The branches are available at most floral supply stores and because they are plastic, they're flexible and easy for anyone to hang the headbands on and off of.


Other lightweight accessories are also great to keep on the branches like hats, sunglasses and jewelry.


This headband was one created by my older daughter, Sophia and I loved it so much that I bought it for my younger daughter.  Sophie charged me full price, I think she'll be a great business woman!

Design Idea: Easy to Make Fun Personal Figures


It's a foggy morning here and while Denise is in her studio (aka the garage) working on a piece for the Long Beach Flea Market this weekend (hopefully we won't get rained out) and I've decided to put up our first design idea.  I did this project a few years ago for my Grandmother Helen's 80th birthday.  Her birthday is October 30th and she decided she wanted to have a big Halloween Costume/Birthday party.  We started planning for the party the summer before which was key because it was going to be a big event. I took several photos of her in a witch's costume which I then used as the invitations - these invites were old school made out of cut paper- no evites.  I also used the witch photo of her to order custom postage stamps, that way invited guests had a little clue when they got their invitations. 

The party invitation was a Trick-or-Treat Bag 

In lieu of a doing a slide show of my grandmother through the years at the party, I decided to do two things. First a scrapbook of her for guests to view and actually sign,  that way they could sign on a page where they remembered her or sign and write a note on a page where they were in a photo with her.  The second idea was to put my grandmother's face through the years on a variety of three dimensional Halloween figures. 

My grandmother's face around 1927 on a Halloween Figure

This first face is of her as a toddler.  These 3-D stuffed characters are really easy to find at discount stores (I paid less than $10 for each one) or you can pick them up for just a couple of dollars at thrift stores.  I scanned the original photo of her into the computer, blew up her face to the approximate size I needed to go over the face of the character and printed it on Avery Ink Jet T-Shirt Transfers.  For this character I was not able to just iron over the existing face, (it was originally a giant bright orange pumpkin head on this body) but rather I ironed the transfer onto a cotton/muslin like fabric large enough for me to hand stitch around her face and neck. I removed the original pumpkin head and stitched on her head.  I reattached the original character's hat of leaves and that was it.  The whole process for this one doll took about 2 hours.

My grandmother's face when she was in her 20's on the body of a scarecrow

This scarecrow doll was made the same way as the first one.  Since these earlier photos of my grandma were obviously in black and white, I thought it would be fun to add a bit of color.   I scanned her photo into the Paint program on the computer where I then added features like the nose, the stitches in the corners of her mouth and the extra eyebrows.  I'm not the best at using the computer for design work and I probably would have just painted these features onto the transfer with acrylic paint if I had needed more detail.

My grandmother's face at age 79 on a witch doll form

My third doll was of her face at the time of her party and I was lucky to find this witch form since she was dressed up as a witch for her Birthday Party.  I was so busy organizing the evening that I didn't even take any pics of the dolls there, but they did make fun, unique and personal display pieces for an 80th Halloween Birthday Party!  The best thing about this project is the time frame, it would obviously take much longer if you had to hand make the entire body of each doll.  Part of the fun is to see what characters you can find to fit your theme and match the faces to them.  Just make sure whatever characters you do find that it will be fairly easy to attach your desired face to the existing body.  The T-shirt iron transfers have been around for awhile and many of you are familiar with them, but if not, once you've practiced with the first one, it's a fairly easy process. You could apply this same idea to really just about any theme - princess, pirate, 40th birthday, retirement or anniversary party, holidays (I think I'll do this project with my girls' faces next Christmas and put them on elf bodies) the possibilities are endless! Hope this is a fun idea you can use!


Tuesday, March 8, 2011

A Sneak Peek Inside Denise's Home


As we are getting to meet and know more and more of you who share our passion for great finds, unique style and the love of decorating - I thought I would give a little peek inside of where my girls and I get to call home for this year- Denise's amazing and eclectic house.  For those of you who know her, you already know each room in Denise's home has a theme and she is constantly adding to, changing and recreating her spaces.  Most of these photos were actually taken a few years ago, but I still thought you may like to see some of her great ideas for decorating. She hopes to take time in the future to blog about specific designs and techniques, so be sure to look for those blogs.  The above photos is of a side courtyard.  The gold ball chairs were purchased at an estate sale and she made the black and white stripe cushions.  The ivy diamond wall is one of her most successful projects.  Measuring the long wall, stretching thin wire into a diamond pattern, and waiting 2 years for the ivy to climb has been a labor of love, but well worth the wait!

Denise loves birdcages and crowns, and here she's placed a Sergio Bustamante sculpture inside of an antique birdcage on an antique pedestal. The cage and pedestal were found at local flea markets.  In fact, not a lot of her finds were purchased in retail locations, but found while happily treasure hunting. The chairs were found at a local consignment shop, just awaiting the right image to be painted, or stenciled, onto them.


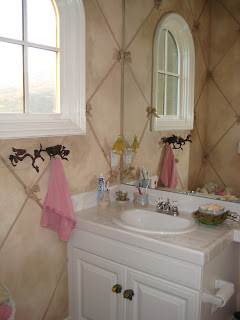
These photos show opposite wall designs in the same powder room. According to Denise, diamonds are not the easiest to measure out in a small powder room, but she feels the effect is worth it.  Here she's  used a huge style vertical door pull as a towel bar, just mounted horizontally.  
The diamonds were handpainted and feature a wooden medallion nailed in each of the diamond's corners.

The Paris Apartment Bedroom features a crown above the bed and wooden curtain tiebacks screwed into the wall to drape back the curtain behind the bed.  The walls of this room are awaiting a blue glaze that Denise wants to add overtop of the blue paint to create an old world feel.  The photo below features a handmade window treatment, just one of the many window treatments Denise custom made for her home.


This is the Girls' Fairy Bedroom.  These great textural trees go all around the room and were accomplished using a tree stencil and joint compound.

The bathroom for this room uses another fun technique where Denise used actual ribbon on the walls in a crisscross diamond pattern and used the same ribbon to tie bows at the corners and attached them with a simple thumbtack.


This is not the best photo, but I wanted to show that this is our dining room chair, yes believe it or not, this is one of four handpainted dining room chairs that our family sits on every night for dinner.  Depending on the type of chair and the material, many of Denise's chairs are functional chairs, these chairs are probably 10 years old! Each chair features a different woman from the Italian artist, Boticelli. The long gold table with black marble top was found at a huge markdown at a local consignment shop!
One of my favorite pieces is this mirror Denise painted. She loves Italian and French design and this image was taken from photographs of a Pompeii mural.  It hangs at her entryway, here you see it decorated for the holidays, and in the reflection of the mirror, up the staircase, is a wonderful mural by artist, Edmond Piffard. 
More of Edmond's mural.
As you could tell by the first photo, Denise's love of decorating is not only limited to the interior of her home.  Along with a local San Diego Pool Company she designed her pool.  She loves urns and bowls and happened upon this large concrete bowl during one of her shopping trips along the roadside shops in Rosarito.  She had part of the lip of the bowl cut away to allow for the water to overflow into the pool.
This gazebo she designed using concrete columns as the base. She then had an iron artist design the top piece to allow for climbing vines to eventually cover the entire top.  Some of you may remember the black and white stripe curtains we use at many of our shows, those curtains Denise actually made to hang in between all of the columns of this gazebo.  She has a great chandelier hanging above the center table and chairs, it makes a great place for entertaining in the evening.

I think out of all of the fun and unique things Denise has created, she is probably most proud of her garden.  She works harder most days outside than in and it definitely shows!

This was just a glimpse into some of the fun and inspiring things my girls and I are surrounded by each day.  A couple of weeks ago my girls were working on a project and I overheard them talking as they were coming from the garage, obviously successful in finding what they needed for their project.  The older one says very seriously to the younger one, "I'm so glad we live in a family of artists."  The little one answers "Yeah, me too" and I quietly answered to myself, ' yeah, me three...'

Monday, March 7, 2011

The 'Divine Miss M' Mannequin


Denise's 'Divine Miss M' Mannequin made her debut this weekend at the Chateau de Fleurs Vintage Marketplace in Fallbrook, CA & the Irvine Flea Market.  She was a popular attraction, the focus of many camera lenses, and the reason behind many smiles, oohs and ahhs.  She was also an inspiration to several customers, one in particular said now she knows how to showcase her great grandmother's wedding gown- put it on a manequin.  I can't tell you how many ladies heart's I had to break at Irvine yesterday when I told them that this was not an actual dress they could wear, but rather a work of art permanently attached to the dress form.  Denise has had such a positive response to her Divine Miss M that she is already searching for unique, beautiful pieces for her next dress form.  Miss Divine is still available, so if you are interested in her please let us know!


Great Weekend at Chateau de Fleurs!!!

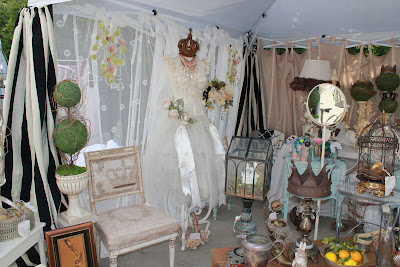
Our Space at Chateau de Fleurs this past weekend in Fallbrook

Crown Chair

More of our Space at Chateau


AMAZING, GREAT, FUN Weekend at Chateau de Fleurs this Past Friday & Saturday!  So many beautiful items from the sweetest, most talented vendors!  It was so much fun to be around the nicest group of people and meet their wonderful customers who we can now call our friends and customers too!  We can't wait until the next Chateau Show in June!  Denise and I want to send a big Thanks to Rita & Christie for their continued support and encouragement, and a big Congrats on putting on such an amazing show!   We are so inspired now to really start producing work, networking online, entering more shows and selling online.  Denise had a lot of questions this weekend about how she executes and accomplishes some of the work she creates.  She hopes to soon start blogging and sharing some of her techniques, so please check our blog often or become a follower!  Thanks to all of those who came by our space this weekend-it was great meeting you!